We’ve done a lot of camping in our trailer over the last few years, and recently decided we wanted the ability to dry camp in places that didn’t have electricity or water. Although I upgraded the interior lights in the trailer to LED’s last year and downgraded our electric jack to a simpler hand-crank model, I still had concerns that our basic deep cycle battery from Walmart wouldn’t run the water pump and propane-powered fridge more than a couple days. In addition, even if we could run everything for a weekend, without access to 110V power at our parking spot back home, how would we recharge the battery for the next trip? After reading a number of blogs from full-time RVers, solar recharging seemed like the answer.
Like every new project, I ended up spending far too much time researching my options and planning the solution. In our case, due to a combination of expected electrical draw and available roof space on our trailer, I decided on a 200 Watt setup using low profile, flexible solar panels. The entire installation cost about $600 and took me about 8 hours, though admittedly the first 2 were spent measuring the roof over and over before I drilled the single hole in it to run the power from the roof to the interior.
Parts
- Two Flexible 100W solar panels
- P30L 30Amp PWM Solar Charge Controller (In hindsight I should have purchased the TrakMax 30L as it’s a 2-stage MPPT controller)
- Water-resistant cable feed-through (to prevent water infiltration into the RV when running power through the roof)
- Eternabond Roof Seal (very sticky stuff to seal down the panels and wires)
- 1″ split wire loom (to protect exposed wiring)
- Two 40A marine-grade circuit breakers
- Two 8AWG butt connectors
- 8AWG crimper
- 3M VHB tape (used under the panels to help secure them)
- Dicor lap sealant (I used self-leveling but non-leveling would be better)
- Set of MC4 Y connectors (typically 14AWG)
- 8AWG marine-grade 5/16″ lugs
- Cable Clamps
- 50-60′ of 8AWG wire (I purchase a set of 25′ 8AWG jumper cables and cut off the ends)
Assembly
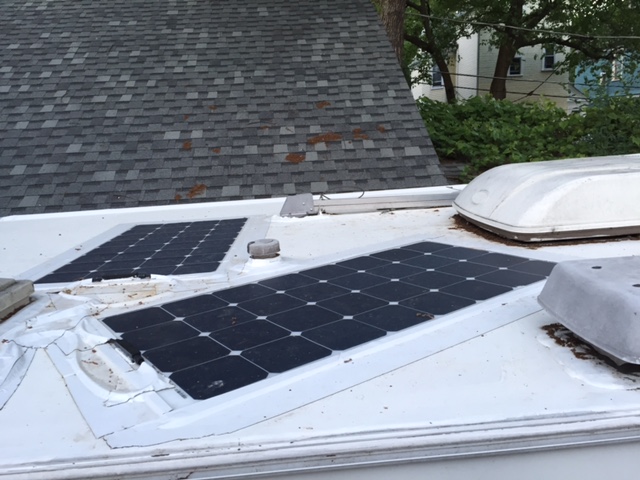
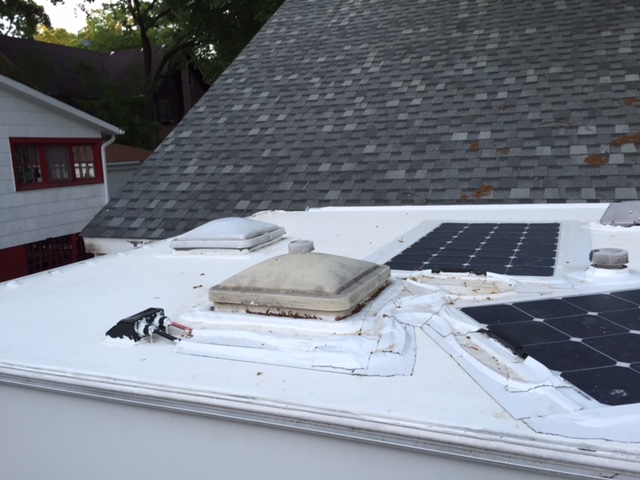
First I laid out the panels on the roof in an effort to find a location where roof vents or accessories wouldn’t cast any shadows (since even a small shadow can significantly reduce the amount of power produced). Because I needed the connectors for both panels to use the same run down the interior and to the charging controller, to get the wires close enough I ended up mounting one panel at a 45 degree angle across the roof.
After measuring probably 50 times, I drilled two 1/4″ holes in the roof and ran the 8AWG wire through the cable feed and down the interior wall between the bunk beds and the bathroom. Unfortunately for me there was a 2×2 horizontally inside the wall, so I ended up removing the trim and wall in order to get the wire out (which sounds scarier than it actually was). I ran the wire under the top bunk along the wall, and then down into the front pass-through storage area, covering the run with the plastic split wire loom wherever it was exposed.
I ran about 15′ of wire from the solar panels to a 40A breaker in the storage area. This protects the charge controller from overload, and as an added bonus allows me to disconnect power from the panels to the controller or rest of the system instantly. Since the panels deliver voltage whenever the sun is full, this will allow me to work on the system in the future without getting shocked or climbing on the roof to cover the panels. From the charge controller I drilled a hole in the floor and ran the remaining 10′ of wire from the controller to the battery, covering it in wire loom and securing it to the frame of the trailer wherever possible. Once secured I filled the hole from the bottom with a healthy dose of Dicor and then covered any exposed runs of wire in the storage area with wire loom as well. I crimped 5/16″ lugs onto all ends except the roof, and made two <6″ runs to connect the circuit breakers to the charge controller.
Finally, I climbed up on top of the trailer to mount and connect the panels. With the panels laid out I verified that the wire length with Y connectors was sufficient, but because it was sunny I didn’t connect the panels yet. Instead I cut the ends off the single connector side of the Y connector, then stripped and butt-spliced the 8AWG wire to the Y connector and then connected the ends of the Y to the panels. I applied 3M VHB (very high bond) tape to the back of the panels and the cable feed-through and stuck them to the roof, then cut lengths of Eternabond and fully secured the panels and all wires to the roof and used Dicor to seal the cable feed-though.
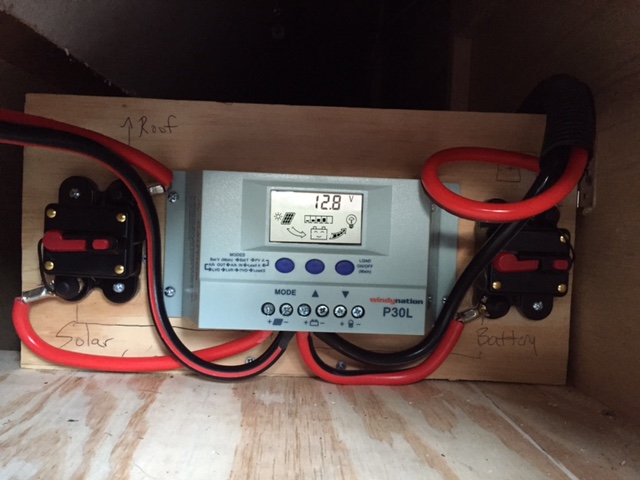
Now assembled, I flipped the circuit breakers to “On” and within 1-2 seconds the charge controller detected the battery voltage and began charging. I adjusted the default charge cut-off (bulk stage) from 13.8V, which is far too low, to 14.8V (according to Renogy, I should charge my flooded deep cycle battery at 14.6V (bulk) and 13.8V (float)). At 14.8V, the charge controller will run the bulk phase to the battery at 14.8V and then the float phase at 93% of that (13.76V). With an 8AWG wire that’s 10′ in length the actual voltage delivered to the battery is 14.66V and 13.62V, respectively. I’ll have to monitor my battery levels to make sure I don’t cook the water off the cells, but at least the math works.
Lessons Learned
Now that I’ve had a little time to reflect on my installation I realize there are a few things I would do differently in the future, or might change about my current setup:
- The circuit breaker for the battery should really be as close to the battery as possible, so that if the wire ever shorts the circuit breaker will trip before the break, not after it. I may move this in the future since the circuit breakers are supposedly waterproof.
- While I was able to get a decent crimp, I should have opted for a more expensive crimper and lugs (and possibly 6AWG wire). Even though the lugs are crimped tight to the wire and the wire is stranded, I suspect I’m getting some loss at each one.
- To fully charge a battery, you need to apply a bulk charge of 14.4 to 14.8V for several hours, then reduce the voltage to 13.5-13.8V and maintain the float charge at that level. The precise voltage depends in part on the battery type. In hindsight I should have purchased a better MPPT charge controller which allows separate adjustment to the bulk and float stages, has an automatic equalize (overcharge) mode to desulfate the battery plates, and because it’s MPPT has a higher efficiency (which is best for northern climates that don’t get tons of full sun hours). My WindyNation P30L controller has a single “Over Voltage” setting point at which it shuts off (13.8V by default). According to WindyNation, this is the “bulk charge” limit and the “float charge” is fixed at 93% of this value. Thus to get a 13.5V float I have to set the bulk charge at 14.6V.
- I was originally concerned with significant voltage drops in smaller gauge wire, so I bought 8AWG, which allows me to run 20A @ 16′ with no more than 3% voltage loss. However with only two 100W panels I’m not going to exceed 12A. In reality 10AWG wire would have been cheaper and I believe there are even pre-wired MC4 cable lengths available up to 10AWG.
So far I’m very happy with my setup. And while it’s not sufficient for a full-time RVer who wants to run their A/C in the summer or watch TV in the winter, it gives us so many additional camping options, even allowing us to use more secluded non-electric sites at state parks.